Want to take control of your crypto assets and explore the world of DeFi? Okto is the decentralized self-custody wallet for you. With Okto, you hold the reins of control firmly in your hands. Safeguard your crypto assets with state-of-the-art security measures, ensuring your peace of mind. Okto Wallet is secure, user-friendly, and feature-rich. It’s the perfect way to store, manage, and interact with your DeFi tokens.
Okto goes beyond security and convenience, empowering users to seamlessly navigate the vast Defi landscape. This all-in-one Web3 app eliminates the need for cumbersome seed phrases, granting users full control of their funds without the risk of a single point of failure.
By harnessing the power of artificial intelligence, Okto’s Multi-Factor Authentication AI feature continuously monitors user activities in real-time, swiftly identifying any suspicious behavior to protect against potential misuse.
Unlock the potential of your crypto assets and dive into the exciting realm of DeFi with Okto, the ultimate decentralized self-custody wallet. Say goodbye to worries about security and fragmented management – Okto is here to revolutionize your DeFi experience. With Okto, you can store, manage, and interact with your DeFi tokens all in one place.
Download Okto today and start exploring the world of DeFi!
How To Create Okto Wallet
Creating an Okta Wallet is a very short process, you are just a few clicks away from your very own defi wallet.
Download the app: To download the official Okto app, use the following link.
Sign Up: Open the Okto app, and sign up using your email, Gmail account, or CoinDCX account. And then enter the OTP sent to your email.
Setup Pin: This will be used to secure your wallet.
Your Okto account will be created, and wallet creation will begin after this. You can now start adding your crypto assets to your wallet.
Also Read: How to create your own MetaMask wallet?
How Do I Sign Up For Okto Wallet?
Signing up on the Okto app is very easy, just follow this step and you will be done in no time.
- Open the app and click on “Sign Up”.
- Enter your name, email address, mobile number, and password.
- Click on “Create Account”.
- An OTP will be sent to your email and mobile number. Enter the OTP to verify your account.
- Your Okto account will be created. You can now start using the app.
How Do I Take A Wallet Backup?
The Okto wallet app provides users with two different options for wallet recovery.
- Online/Cloud Backup
- Offline Recovery Phrase
Online/Cloud Backup
To back up your Okto wallet to the cloud, you can follow these steps:

- Open the Okto app.
- Tap on the “Accounts” tab.
- Tap on the “Security” tab.
- Tap on the “Cloud Backup” button.
- Follow the instructions on the screen to create a backup of your wallet.
Offline Recovery Phrase
In addition to cloud backup, users can also create an offline recovery phrase. This is a 12-word phrase that can be used to restore your wallet if you lose access to your device or your cloud backup. To create an offline recovery phrase, follow these steps:

- Open the Okto app.
- Tap on the “Accounts” tab.
- Tap on the “Security” tab.
- Tap on the “Offline Recovery” button.
- Follow the instructions on the screen to create your recovery phrase.
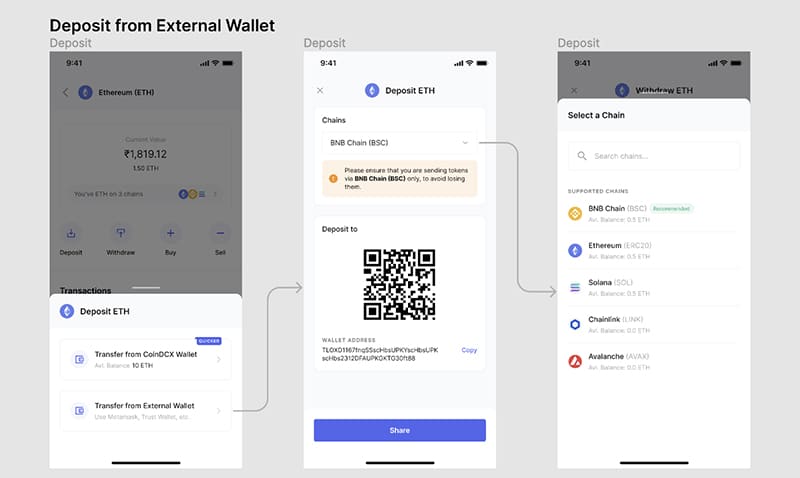
How Do I Add Funds to Okto Wallet?
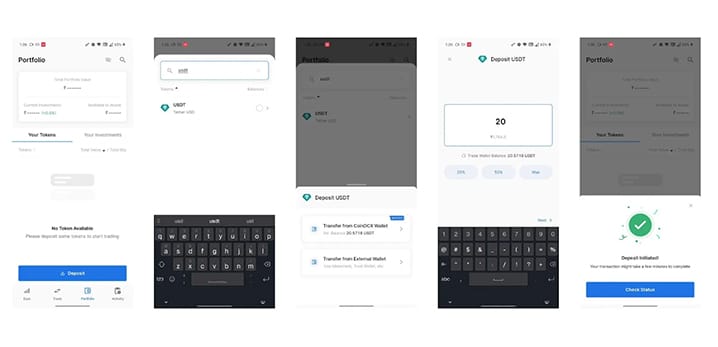
Now that you have created your account and backed up your private key, you are ready to fund your wallet. Follow these simple steps to get started:

- In your portfolio, you’ll find a list of supported tokens. To deposit a specific token, simply search for its name using the search bar.
- Select the token you want to deposit, and a wallet selection screen will appear. Here you will see an example for USDT

- Choose the wallet from which you wish to transfer the token. If you’re transferring from CoinDCX or an external wallet, select the respective option.
- Enter the amount of the token you want to transfer to Okto. Double-check the details to ensure accuracy.
- Swipe or tap on the “Confirm” button to initiate the transfer. Within seconds, your crypto assets will be securely transferred to your Okto wallet.
How do I Swap Tokens on the Okto Wallet?
Okto offers a seamless token swapping feature, allowing you to trade and exchange your tokens effortlessly. Follow these simple steps to initiate a token swap on Okto:
- Open the Okto Wallet app on your device and log in to your Okto account.
- Tap on the “Trade” button located at the bottom of the screen. This will take you to the Trade page, where you can explore different trading options.
- On the Trade page, use the search bar to find and select the token you wish to buy. Let’s say you want to buy BNB (Binance Coin).
- Choose the token you want to sell against BNB from your portfolio. Select the desired token from the available options.
- Enter the trade amount, specifying the quantity of the token you want to sell or the amount of BNB you wish to purchase.
- Before proceeding, it’s important to check the gas fees associated with the transaction. Tap on the “Gas Fee” or “Network Fees” option to view the current fees.
- Carefully review the trade details, ensuring that you’ve selected the correct tokens and entered the desired trade amount accurately.
- Once you’re verified the details, click on the “Next” button to proceed to the confirmation screen.
- Take a moment to review the transaction summary, including the estimated gas fees. This will give you an idea of the network fees you’ll be charged for the trade.
- When you’re ready, confirm the trade by tapping on the confirmation button.
How to Earn Passive Income in DeFi with Okto?
- Tap on the “Earn” button located at the bottom of your screen within the Okto app. This will take you to the Earn page, where you’ll find various available liquidity pools.
- Take your time to explore the different liquidity pools offered. Each pool may provide different returns and opportunities. You can browse through the available options to find the one that suits your preferences. For example, you can search for USDt and click on USDT to see all the available pools associated with USDT.
- Once you’ve selected a liquidity pool that interests you, it’s time to get started. To invest in the pool, you’ll need to provide an equal amount of both tokens in the liquidity pool. Let’s say you choose the UCON-USDT pool. You would invest an equal value of both USDT and UCON tokens.
For example, you could invest $10 worth of UCON and $10 worth of USDT. If you don’t have a sufficient balance of these tokens, you can transfer funds from your other wallets to Okto or use the swapping feature to acquire the required tokens.

- Before finalizing your investment, carefully review your order to ensure that you’re investing the desired amounts and in the correct pool.
- Once you’re satisfied with the investment details, confirm your order to add liquidity to the chosen pool.
Congratulations! You’ve now successfully invested in a liquidity pool. Sit back, relax, and watch as your crypto starts generating passive income for you.
Important Note:
- To ensure user funds security, users aren’t allowed to sign out of Okto unless they take a wallet backup
- Cloud backup is mandatory on Okto Wallet and Offline recovery phrase is optional in addition to Cloud backup
- Without cloud backup, users can’t initiate a transaction
- Okto doesn’t store your recovery file and Okto can’t help the user to recover his wallet if the recovery file is lost/deleted.
In conclusion, Okto Wallet is a powerful decentralized self-custody wallet that allows you to explore the world of DeFi with ease and security. With Okto, you have full control over your crypto assets, eliminating the risk of a single point of failure. The app offers state-of-the-art security measures, including Multi-Factor authentication AI, to ensure the safety of your funds.


