Buying Bitcoin for your investment portfolio is certainly beneficial over the long term. To buy Bitcoin all you need is an account on any of the crypto exchanges. On the crypto exchange CoinDCX, you can easily buy bitcoin in India. You will find all the necessary steps required here.
First, you need to Download CoinDCX App from Appstore or Playstore or you can open the CoinDCX website.
After downloading the App you can follow the below steps to Sign Up in CoinDCX.
1. Sign Up in CoinDCX
Step 1- Click on the Sign-up button.
Step 2– It will ask you for your First Name, Email, Password, and Mobile Number.
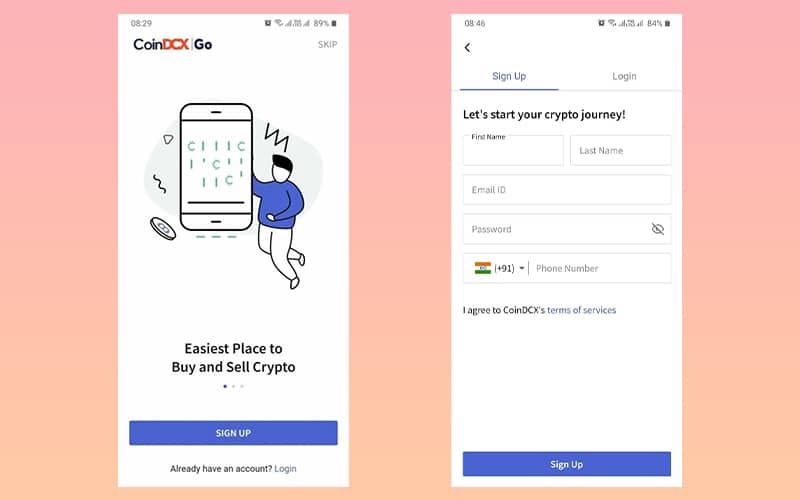
Step 3– After entering the details and clicking on the Sign-up, You will ask for OTP which you will receive on your Mail or your Registered Mobile Number via SMS. As soon as you are verified, you will be logged into your CoinDCX account.
2. Security Option
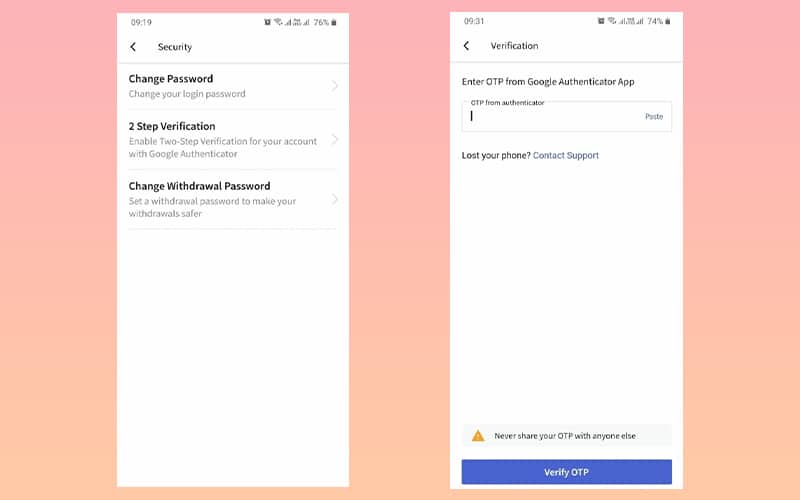
To check in your security option, you can click on the bottom of the screen and click on Security. After that, you will have three options.
- Change Password
- 2 Step Verification
- Set Withdrawal Password
It’s better to keep your Withdrawal Password different from your Account Password. Which will enhance your account security. Your password must contain at least 1 lowercase, 1 uppercase, 1 number, and have a minimum length of 8 characters.
After that, you can set up a 2 step Verification option which is known as a 2FA. To do this, First, you need the Google Authenticator mobile application on your device. Then click on 2 Step Verification and follow the steps. Once 2FA is activated, you will be asked to enter 6 digit OTP whenever you log in to CoinDCX.
Here, In the next few steps, we will understand how to set up Two-Factor Authentication (2FA) to enhance the user’s security.
Mainly, There are two types of Two-factor Authentication.
- App-Based 2FA
- SMS/Email-Based 2FA
App-Based Two-factor Authentication (2FA)
- Click on Homepage, Click on settings.
- Click on Two-Factor Authentication and Select the Authenticator App.
- Fill the Blank with OTP, which you will receive on your register Email and SMS, and press Next.
- Open the Authenticator app and fill in details for New account setup. You can scan your CoinDCX Barcode or manually enter the Recovery code into your authenticator app.
- Now go back to CoinDCX and Enter the OTP, which shows in your Authenticator App.
- Save the Recovery Code, which might help you in the future to recover or log in.
- Open your Email and Click on Approve 2FA request.
SMS/Email-Based Two-factor Authentication (2FA)
- Select on Profile Button and Click on Account Setting.
- Search for Two Factor Authentication and Select Mobile SMS.
- Enter the OTP you see on your Authenticator app & tap on Next.
- Enter the OTP you receive on SMS/Email & tap on Next.
- Open your Email and Click on Approve 2FA request.
Note –While doing this setup, if you are getting any error like ‘incorrect or expired OTP’ then follow this Setup.
- Open the Authenticator app & tap on Menu.
- Tap on Settings.
- Tap on Time correction for codes.
- Tap on Sync now.
3. Complete Your KYC Verification?
To access all Services on CoinDCX, You need to complete your KYC verification.
Step-1 Go to the Account and select the Account setting option.
Step-2 It will show you the Complete Your KYC option. Click on it and select Continue.
Step-3 To complete your KYC verification process Please Carry your Adhar Card or Passport, and PAN card. So you can easily fill in all the details in the verification process.
Step-4 In the next few minutes, It will ask you for a selfie (Your Face should be visible).
Then it will ask you to upload your documents such as
- Adhar Card
- Passport photos
- PAN Card. D
During this, Note that all your all Photos must be visible and Authenticated by the government.
Step-5 After Successful submission of all documents, It may take 24 hours to verify according to the Standard Verification Process. After successful verification, you will receive the Mail.
4.Deposit Funds on CoinDCX?
Step-1 Click on the Available to invest (+Add Funds) option under the account. From here you can Add and withdraw your Funds. Click on add funds to add INR to the account. Here you can also see the last transactions.
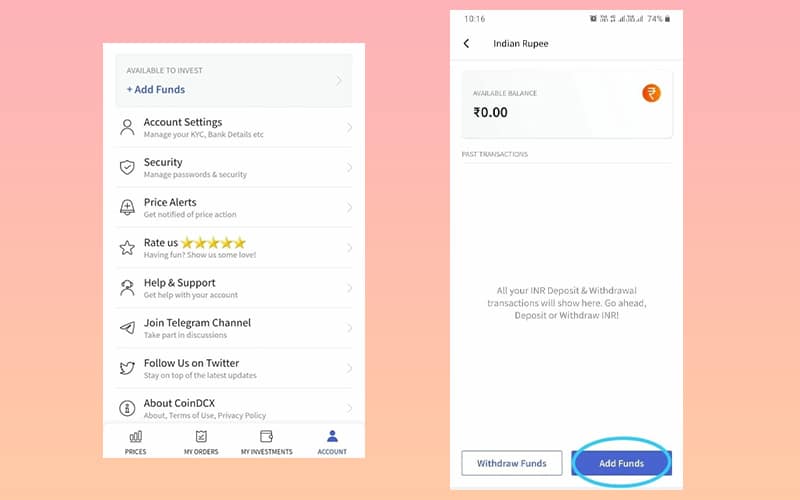
Step-2 After Clicking on Add Funds, It will show you two options to add funds to your account.
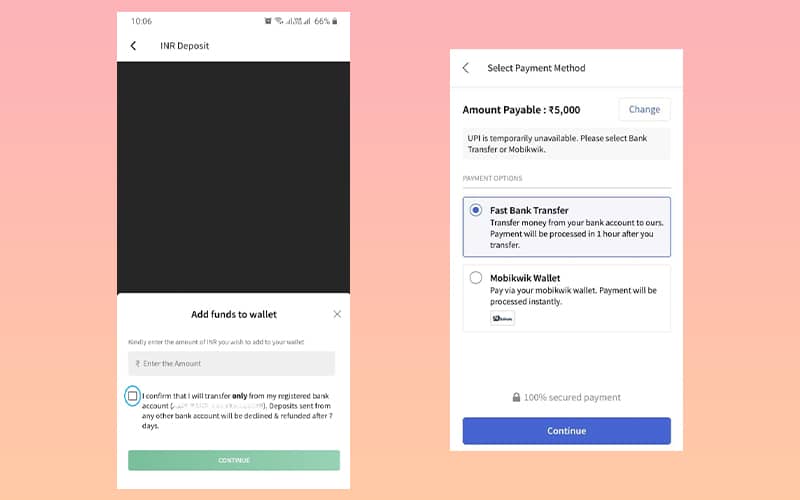
FAST BANK TRANSFER (IMPS/NEFT/RTGS) – By using this option you can directly add your funds by net banking.
MOBIKWIK WALLET- Select the Mobikwik option. Enter the Amount you want to add and then click on continue. Here you will see the Mobikwik option, where you can add money by using UPI or any Third Party App.
After a successful transaction, You can see your deposit Money in your Account.
5. Buy bitcoin on CoinDCX
After Successful Signup, You can see the Price of different cryptocurrencies on the PRICE page. Where you can analyze different cryptocurrency rates and if you want to buy Bitcoin then Click on it.
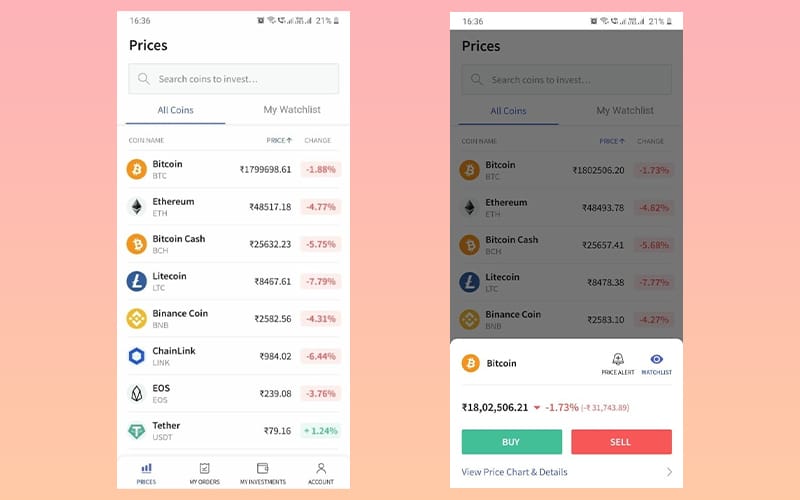
After clicking on that you can see the Buy/sell option. Where you can buy Bitcoins by paying an Amount. Note that your Total amount should not be less than the Minimum required buy amount.
After Deciding the amount of bitcoin you want to buy, complete SWIPE To BUY to place your order. It’s Done. Your Bitcoin will show on your Portfolio Page.
CoinDCX News: CoinDCX is the First Crypto Unicorn of India after its latest funding round
What to do in case your transaction is completed but still, it is not showing in your CoinDCX account?
If you are facing any issue related to Transaction or Your CoinDCX account does not show any deposit the
- UPI deposit – CoinDCX account will be credited within a couple of hours if the UPI status is successful however whenever your transaction might get stuck in the banking process which can take up to 7 days to settle in either direction.
- IMPS/NEFT/RTGS –At the moment, you should consider 7 banking days as the maximum time it will take for IMPS/NEFT/RTGS/UPI deposits to reflect. Most deposits happen in a much shorter time (even 1 hour). Please try and avoid contacting the support team unless your deposit has not been reflected for more than 72 hours.


